How to automate energy management and cut costs
- May 6
- 10 min read

TL;DR:
Automating energy management involves deploying an EMS layer over building controls like HVAC and lighting to optimize energy use dynamically. Starting with a pilot project, measuring baseline consumption, and gradually scaling across subsystems ensures reliable savings and system stability. Continuous monitoring, adaptive feedback, and thorough integration planning are essential to sustain performance and maximize cost reductions.
Watching your energy bills climb while your building sits mostly empty, or realizing that your solar panels are exporting cheap power at noon and buying expensive grid electricity at 7 PM, are frustrations that too many European homeowners and property managers know firsthand. Manual scheduling, fixed timers, and basic dashboards simply cannot keep pace with dynamic electricity tariffs, shifting weather, and varied occupancy patterns. This guide gives you a concrete, step-by-step roadmap to move from reactive energy spending to fully automated, closed-loop control that saves money, reduces carbon output, and keeps you in charge.
Table of Contents
Key Takeaways
Point | Details |
Start with a pilot | Test automation on a small scale to prove value and minimize risk before scaling. |
Prioritize interoperability | Ensure your new solutions integrate with existing building controls for smoother deployment. |
Monitor and adapt | Success depends on post-installation monitoring and adjusting your system based on real-world data. |
Track your results | Expect measurable savings—most see 9-12.5% energy cost reductions with proper automation. |
What you need to automate energy management
Before purchasing any hardware or software, you need a clear picture of what “automation” actually means in a building context. Many people confuse an Energy Management System (EMS) with a Building Management System (BMS) or Building Automation and Control System (BACS). They are related but not the same thing.
A BMS or BACS controls physical building functions: HVAC, lighting, access, and security. An EMS sits as an optimization layer on top of those controls. As EMS vs BMS research explains, for European buildings, “automation” of energy management is usually built as an EMS layer over building controls, turning energy data into optimization actions in a closed loop, not only dashboards. That distinction matters enormously. A dashboard tells you what happened. An EMS with closed-loop automation decides what to do next and acts on it without waiting for you.
Knowing that, here is the hardware and software checklist you need to assemble before anything else:
Required components for energy management automation:
Smart meters and sub-meters to capture real-time consumption at the circuit or appliance level
IoT sensors for temperature, occupancy, irradiance, and humidity where relevant
Inverters with open APIs so your solar PV communicates bidirectionally with your EMS
Battery storage with charge/discharge control accessible via software (Modbus, BACnet, or RESTful API)
EV charger integration for load-shifting vehicle charging to off-peak windows
A centralized EMS platform capable of running optimization algorithms on 15-minute or shorter cycles
Reliable connectivity (wired LAN for critical components, Wi-Fi or cellular as backup)
A data historian or cloud platform to store trends for analysis and continuous improvement
You also need to understand which communication protocols your existing equipment uses. Smart building technology in Europe commonly relies on Modbus RTU/TCP, BACnet/IP, KNX, or DALI for legacy systems, while newer devices often support REST APIs or MQTT. Mixing protocols without a translation gateway is one of the most common and expensive mistakes in automation projects.
The energy management essentials for residential and commercial buildings share one universal truth: the more fragmented your device ecosystem, the harder integration becomes. The automation fundamentals guide reinforces the same point by showing why planning your integration layer first saves weeks of rework later.
Component | Why it matters | Typical protocol |
Smart meter | Real-time consumption baseline | DLMS/COSEM, P1 port |
Solar inverter | Feed-in and self-consumption control | Modbus TCP, SunSpec |
Battery storage | Arbitrage and backup management | CAN bus, Modbus |
EV charger | Demand-side load shifting | OCPP 1.6/2.0 |
HVAC controller | Largest flexible load in most buildings | BACnet, KNX |
Pro Tip: Audit every device’s native protocol before you specify an EMS. Build your integration plan around what you already have rather than replacing equipment purely for protocol compatibility. A well-chosen gateway can bridge legacy Modbus devices to a modern REST-based EMS for a fraction of the cost of replacement hardware.
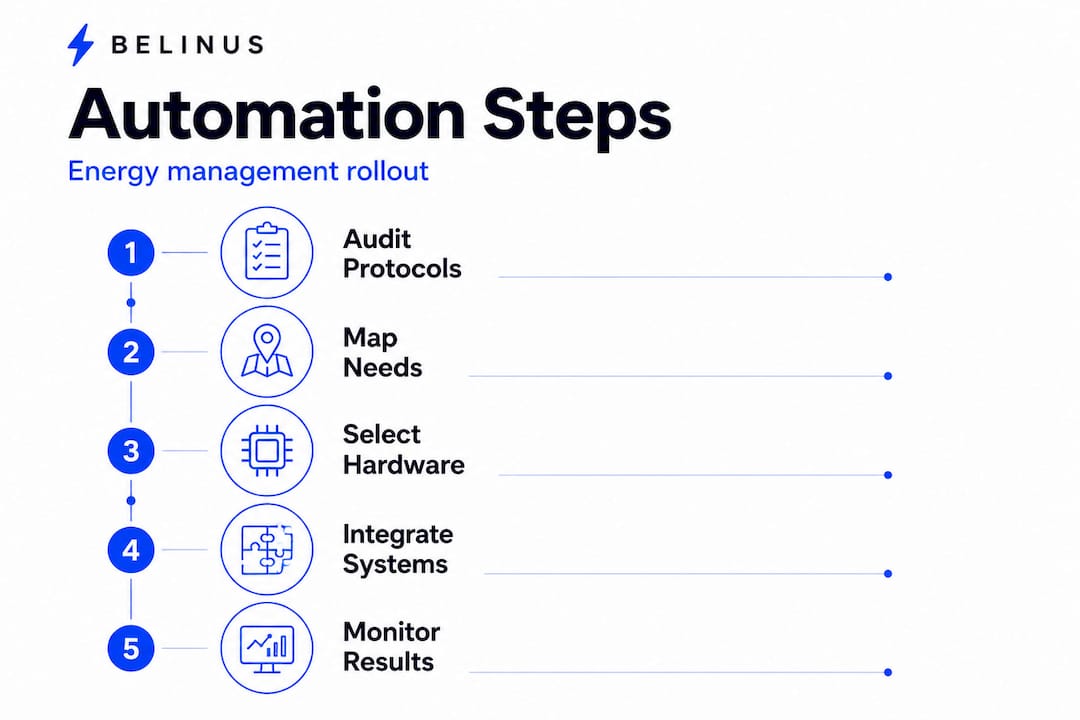
Step-by-step process to automate your energy management
With your requirements mapped, here’s how to roll out automation efficiently, step by step.
The single biggest mistake property managers make is trying to automate everything at once. A practical methodology for implementing automation is to start with a pilot on one subsystem or site, prove ROI, then build reliable data backbones and interoperability before scaling to portfolio-wide closed-loop control. That sequence exists for a good reason: it limits risk, generates real performance data, and builds internal confidence before larger capital is committed.
Here is the full implementation roadmap:
Define your baseline. Install sub-metering and collect at least four to six weeks of consumption data across all major loads. You cannot optimize what you have not measured.
Identify your highest-value flexibility. In most European homes and commercial buildings, the top three flexible loads are HVAC, battery storage, and EV charging. Rank them by controllable kilowatt-hours per day.
Select your pilot subsystem. Choose the single load with the most controllable energy, typically HVAC or battery storage, and automate it first. This generates the fastest measurable return.
Integrate and test communication. Connect your pilot device to the EMS and verify bidirectional data flow. Confirm that automated commands are received and executed within acceptable latency.
Run the pilot for 30 to 60 days. Compare automated performance against your baseline. Document savings, anomalies, and any edge cases that the automation did not handle correctly.
Prove ROI and build the data backbone. Use pilot results to justify the next phase. Simultaneously, build out your data infrastructure, a centralized historian, API connections to utility tariff feeds, and weather forecast integration.
Scale to additional subsystems. Add battery arbitrage, solar curtailment prevention, EV charging schedules, and demand response one layer at a time.
Enable portfolio-wide closed-loop control. Once individual subsystems are stable, connect them under a single EMS that optimizes across all loads simultaneously. This is where the largest efficiency gains emerge.
“Interoperability often determines project success. Don’t skip integration planning.”
Scaling building automation requires that integration planning step to come before procurement, not after. Following pilot project best practices will help you structure each phase with clear success criteria so you know when it is safe to advance.
Automation maturity comparison:
Approach | Control method | Cost reduction potential | Effort to implement |
Manual | Human scheduling | 2 to 4% | Low |
Semi-automated | Rule-based timers | 5 to 8% | Medium |
Autonomous/closed-loop | AI/algorithmic optimization | 9 to 12.5%+ | High initially, low ongoing |
The jump from semi-automated to fully autonomous is significant, but so is the jump in complexity. That is why the pilot-first approach matters so much.

Best practices and common pitfalls in energy automation
Once your automation is in place, keep it working well and avoid common mistakes with these expert tips.
Field experience reveals a consistent pattern: automation that performs brilliantly in the first three months starts drifting by month six because nobody built in a feedback loop. The best-performing automated buildings treat their EMS as a living system, not a one-time installation.
Best practices that experienced operators follow:
Monitor continuously, not just at commissioning. Set automated alerts for anomalies like unexpected consumption spikes or missed optimization cycles.
Track heat pump performance closely. Field research shows heat pump performance in real installations can deviate significantly from expected standards due to design, settings, and operational factors. Automation must include post-installation monitoring and adaptive feedback to catch this drift early.
Use smart meters for granular troubleshooting. Aggregate data hides problems. Circuit-level sub-metering reveals which specific load is behaving unexpectedly.
Schedule quarterly optimization reviews. Tariff structures change. Occupancy patterns shift. Automation rules set in January may be suboptimal by September.
Involve skilled labor in tuning. Energy automation is not purely an IT task. Someone who understands both electrical systems and software is essential for proper tuning, especially for battery charge/discharge cycles.
Plan for edge cases from day one. Rare but impactful events, like a mid-summer grid frequency event or an unusually cold snap, will expose gaps in your logic. Document and address them.
Common pitfalls to avoid:
Ignoring legacy BMS compatibility until after procurement
Treating the EMS dashboard as the end goal rather than the starting point (see dashboard vs automation for a detailed breakdown)
Failing to budget for post-commissioning tuning labor
Relying on smart energy solutions that promise full automation but lack open APIs for integration
Pro Tip: Set up automated anomaly detection in your EMS that flags any day where energy consumption deviates more than 15% from the forecast baseline. Early detection of sensor drift, equipment faults, or control failures saves significantly more money than any optimization algorithm.
Verifying results: What success looks like
To know your automation investment is working, here’s how to track and interpret outcomes.
One of the most common complaints from property managers who implement energy automation is that they “can’t tell if it’s working.” That usually means they didn’t define success before starting. Setting clear, measurable targets upfront transforms ambiguous results into confident reporting.
Research on autonomous decision systems shows that closed-loop optimization approaches, when forecasting and optimization are integrated, deliver cost reductions with higher renewable utilization. Most well-implemented projects target 9 to 12.5% reductions in operational energy costs as a realistic benchmark.
Key metrics to track after implementing automation:
Energy cost per square meter per month compared to the pre-automation baseline
Self-consumption ratio for solar PV (percentage of generated solar energy used on-site vs. exported)
Battery round-trip efficiency and cycle utilization to confirm storage is being used strategically
Peak demand reduction expressed in kilowatts avoided during utility peak hours
Renewable energy share as a percentage of total consumption
Occupant comfort scores captured through periodic surveys or comfort sensor data
Grid import during peak tariff hours as an indicator of successful demand shifting
For solar and storage savings and energy management ROI examples, the most successful projects report two improvements simultaneously: lower bills and higher renewable self-consumption, typically within the first six months.
Metric | Before automation | Target after 12 months |
Energy cost per m² | Baseline | 10 to 12% reduction |
Solar self-consumption | 25 to 40% typical | 60 to 75%+ |
Peak grid import | Baseline kW | 20 to 30% reduction |
Battery utilization | N/A or manual | 85%+ of optimal cycles |
Reviewing energy savings benchmarks across similar property types provides useful context when interpreting your own numbers. A result that looks modest in isolation may actually represent strong performance relative to comparable buildings.
A successful automation project is not just about savings on paper. It delivers consistent, repeatable performance month after month because the control logic adapts to changing conditions rather than relying on assumptions made at installation time.
Beyond the basics: The hidden keys to successful energy automation
After years of working with homeowners and property managers across Europe, one pattern is unmistakable: the projects that fail rarely fail because of bad hardware. They fail because integration was treated as an afterthought.
Most automation guides focus on equipment specs: which inverter, which battery chemistry, which EMS software. Those things matter, but they are secondary to a far more fundamental question: can all of these devices actually talk to each other in real time? Protocol connectivity, specifically enabling Modbus, BACnet, and other integration links, is what determines automation success without forcing a disruptive rip-and-replace of your existing control stack. This is the single most overlooked factor in residential and commercial automation projects.
The second hidden key is adaptability. “Set-and-forget” automation is a myth. A rule that optimizes battery charging perfectly in spring will underperform in winter when heating loads dominate and solar irradiance is lower. Real success comes from automation that learns, adjusts, and responds to feedback. Buildings are living systems, and your control logic needs to behave accordingly.
Third: data feedback is not optional. The most advanced hardware in the world running on stale or incomplete data will make poor decisions. Investing in solid sub-metering, reliable data pipelines, and frequent model updates is the unglamorous work that separates buildings that achieve 12% savings from those that plateau at 3%.
We genuinely believe that why advanced energy management matters comes down to this: the technology is ready, the tariff structures increasingly reward flexibility, and the only remaining barrier for most properties is the integration planning work that too many people skip. Do that work first, and the hardware choices become far less critical.
Ready to automate your energy management?
If this guide has made one thing clear, it is that successful energy automation is as much about strategy as it is about equipment. The right EMS, well-integrated and continuously tuned, is the difference between a promising pilot and real, sustained savings across your entire property.

At Belinus, our centralized EMS platform runs 15-minute dynamic tariff optimization and connects to solar inverters, battery storage, and EV chargers through a unified RESTful API and mobile dashboard. Whether you are starting with a single residential installation or managing a commercial portfolio, our team and affiliated network covering Evonity EV chargers, Solarimex PV wholesale, and SolarPlus installations can help you design, deploy, and scale automation that actually delivers. Explore our solutions at Belinus and take the next step toward smarter, more profitable energy management.
Frequently asked questions
What is the difference between EMS and BMS in energy automation?
An EMS focuses on optimizing and tracking energy use across generation, storage, and consumption, while a BMS manages physical building controls like HVAC and lighting. In practice, EMS automation leverages BMS infrastructure to turn energy data into real optimization actions rather than passive dashboards.
How much money can automation typically save on energy costs?
Automated systems using closed-loop optimization deliver 9 to 12.5% reductions in operational energy costs, with even greater savings when solar forecasting and demand response are integrated. Results vary by building type and existing efficiency baseline.
Are energy automation solutions compatible with all types of systems?
Most systems can be automated, but compatibility depends heavily on protocol support. Protocol connectivity like Modbus and BACnet must be assessed before any procurement decision to avoid costly replacements.
What is the first step to implement energy automation?
Start with a single-subsystem pilot, measure baseline consumption, and prove ROI before scaling. A practical methodology recommends building your data backbone only after validating results from that initial pilot phase.
How do I ensure my automation keeps working optimally?
Continuous monitoring, quarterly rule reviews, and adaptive feedback loops are essential for sustained performance. Field studies on heat pumps confirm that real-world performance drifts over time without post-installation monitoring and adjustment.
Recommended
Comments