Solar Panel Maintenance Guide for Maximum Efficiency
- Jan 22
- 13 min read

Climbing onto a rooftop in Belgium or the Netherlands to check your solar panels often feels daunting unless you know exactly what you’re looking for and how to do it safely. The right gear and inspection routine protect your investment and prevent costly accidents. With practical advice on gathering certified personal protective equipment, choosing inspection tools for photovoltaic systems, and using approved cleaning methods, this guide empowers you to handle solar panel maintenance with confidence and care.
Table of Contents
Quick Summary
Key Insight | Explanation |
1. Gather Appropriate Tools First | Ensure you have safety equipment and inspection tools ready to prevent accidents and check system health. |
2. Regularly Inspect Your Panels | Perform visual and electrical inspections at least twice a year to catch issues before they escalate. |
3. Clean Panels with Care | Use soft brushes and deionized water to clean panels safely, avoiding damage that impacts performance. |
4. Monitor System Performance | Use monitoring apps to track output regularly and identify problems early for cost-effective repairs. |
5. Document All Maintenance Actions | Keep a detailed log of inspections, repairs, and cleaning efforts for accountability and future reference. |
Step 1: Gather Essential Tools and Safety Equipment
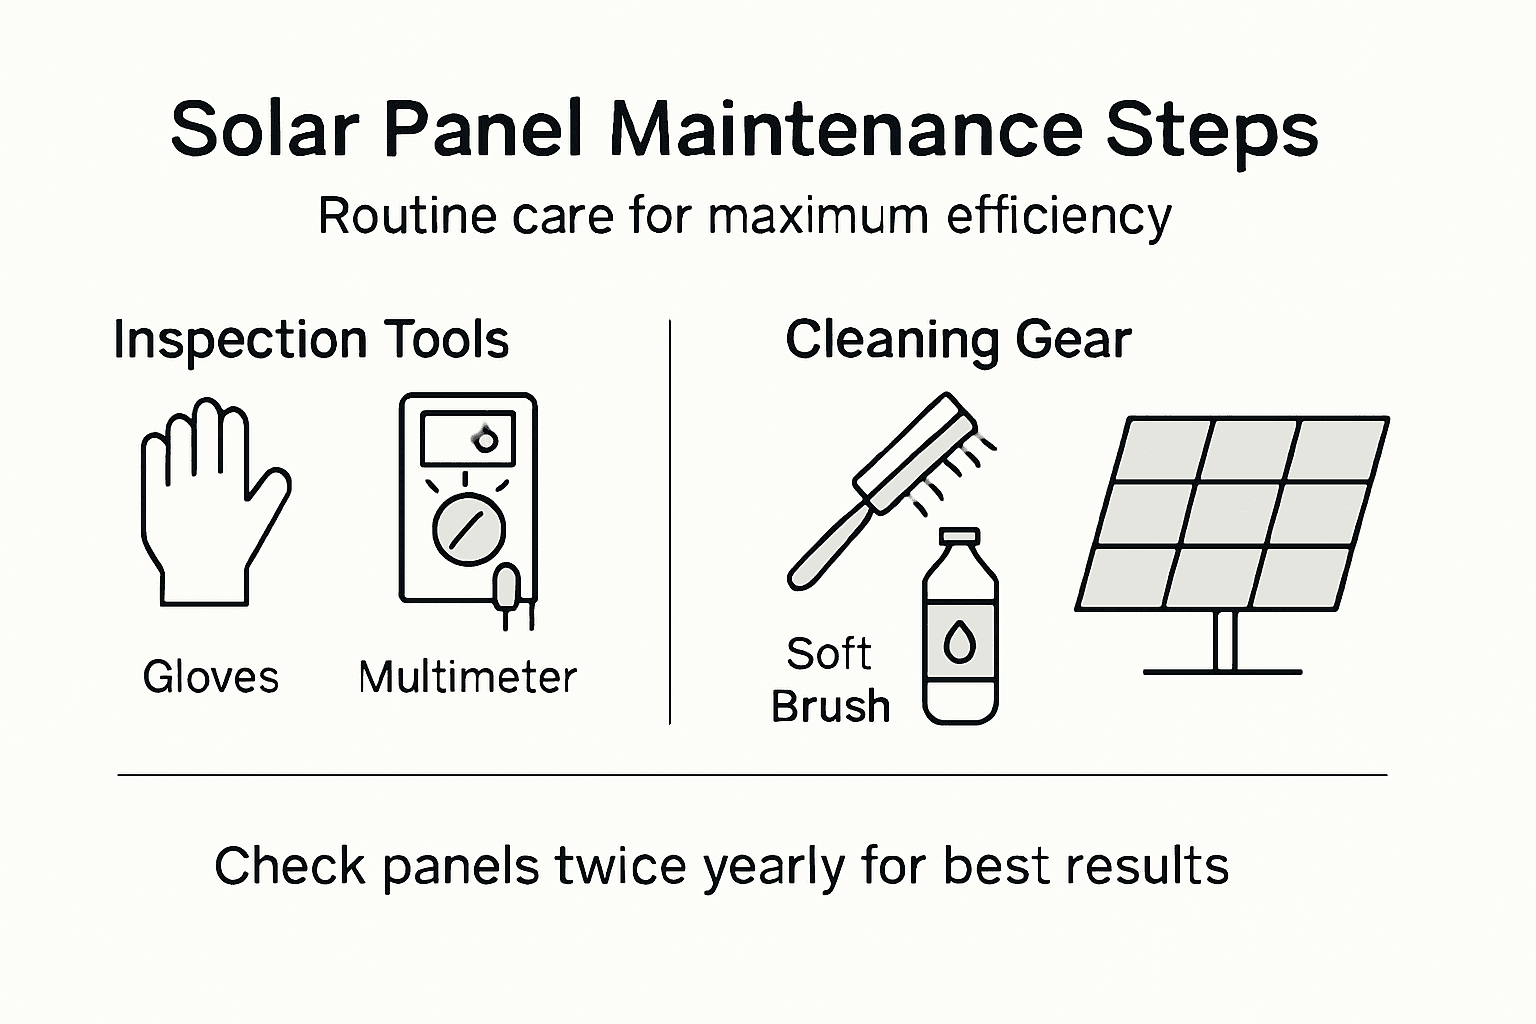
Before you touch anything on your solar panel system, you need the right equipment in hand. Having everything prepared prevents dangerous improvisation and ensures you can complete your maintenance work safely and efficiently. Your toolkit will include personal protective gear, inspection equipment, and cleaning supplies specifically designed for photovoltaic systems.
Start with personal protective equipment because electrical hazards are real risks when working with solar panels. You’ll need insulated gloves rated for the voltage your system produces, typically 400 to 800 volts for residential installations across the Benelux region. Safety glasses protect your eyes from dust, debris, and cleaning solutions. A hard hat protects against head injuries if you’re working on rooftop installations. For fall protection, a harness and lanyard are non-negotiable if your panels sit more than a few feet above ground level. Wear long sleeves and pants made from non-conductive material to minimize electrical contact risk. Closed-toe shoes with good grip prevent slips on potentially wet roof surfaces. Certified personal protective equipment meeting European safety standards gives you the protection that actually matters.
Inspection tools let you diagnose problems before they become expensive repairs. A digital multimeter measures voltage, current, and resistance in your system’s wiring and connections, helping you spot electrical issues. An infrared thermometer reveals temperature variations across your panels that indicate shading or equipment problems. Infrared cameras and specialized inspection tools provide detailed diagnostics for more thorough assessments. A flashlight or headlamp helps you see connections clearly, especially if you’re working early morning or late afternoon. Keep a notepad handy to document what you observe during inspections.
Cleaning equipment requires specific choices because wrong materials damage expensive panels. Soft-bristled brushes designed for solar panels won’t scratch the glass surface. Deionized water prevents mineral deposits and streaking that tap water leaves behind. A squeegee made from rubber removes water without scratching. Never use harsh chemicals or abrasive scouring pads, which permanently reduce panel efficiency. Consider a water-fed pole system that lets you clean from ground level without climbing, reducing fall risk significantly.
For electrical work, you’ll need a lockout/tagout kit to ensure your system stays de-energized while you work. This prevents accidental reconnection during maintenance. Have wire cutters, crimpers, and a wire stripper for any connection work. Keep a multimeter calibration tool to verify your meter accuracy before critical measurements. An adjustable wrench handles various bolt sizes on mounting hardware.
Pro tip: Create a labeled kit and store everything in a weatherproof container near your panel access point so tools are ready when you need them without rushing or forgetting items.
Here’s a summary of essential equipment types and their main roles in safe solar panel maintenance:
Equipment Type | Main Purpose | Example Tool |
Personal Protection | Prevent injury/electric shock | Insulated gloves, harness |
Inspection Tools | Diagnose system issues | Digital multimeter |
Cleaning Equipment | Safely remove contaminants | Soft-bristled brush, squeegee |
Electrical Work Tools | Safely modify connections | Wire cutter, lockout kit |
Step 2: Inspect Solar Panels for Damage and Debris
This is where you catch problems before they become expensive failures. A thorough inspection combines visual assessment with careful attention to electrical performance, helping you identify everything from minor soiling to serious structural damage. You’ll examine your panels systematically, checking for physical damage, debris accumulation, and any signs that performance may be declining.
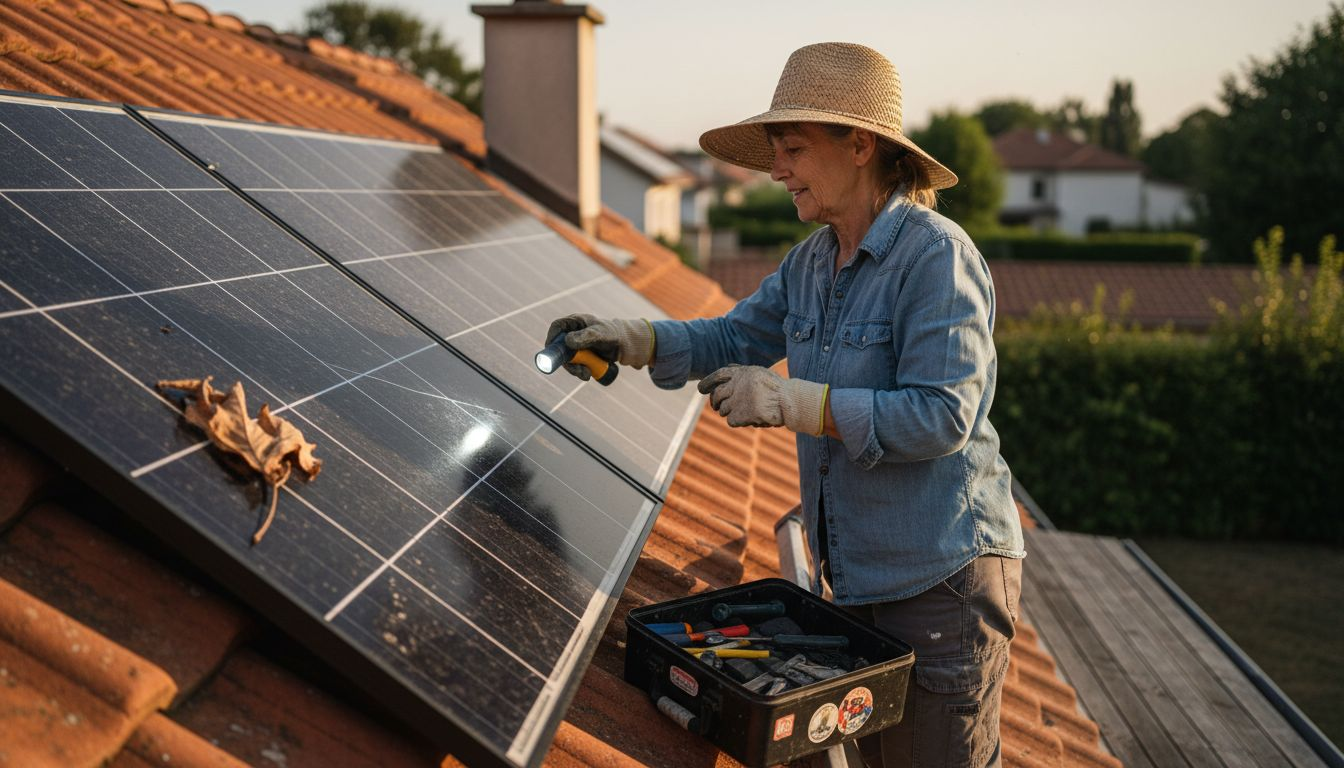
Start with a visual walkthrough of your entire system from ground level using binoculars if your panels sit high on the roof. Look for obvious damage like broken glass, which appears as dark spots or cracks across the panel surface. Discoloration or browning indicates delamination, where the protective layers inside the panel are separating. Check the frame and mounting hardware for corrosion, rust, or loose bolts that could compromise stability. Debris tells you plenty about maintenance needs. Leaves, bird droppings, dust accumulation, and moss growth all reduce light reaching your cells, which directly cuts your energy output. In the Benelux region, seasonal leaves and wet weather create ideal conditions for debris buildup, so this step matters year-round. Look particularly at the bottom edges of panels where debris tends to collect. Check connections between panels and verify that all cables are securely fastened without signs of wear or water damage. Regular visual and electrical inspections reveal physical damage, soiling, and degradation that impact long-term performance.
Next, use your multimeter to check electrical connections and verify proper voltage output. Turn off the system at the inverter before testing, then carefully probe the positive and negative terminals on junction boxes. Your readings should match what the system specification sheets indicate. If voltages are significantly lower than expected, it suggests internal cell damage or manufacturing defects. Scan the panel surface with your infrared thermometer, looking for cold spots that indicate cells aren’t generating power properly. A healthy panel maintains relatively even temperature across its surface. Hot spots or consistently cooler areas suggest problems. Pay attention to shading patterns too. Trees, roof edges, chimneys, or neighboring buildings that cast shadows during peak sun hours reduce your system’s productivity dramatically. Even partial shading of one panel affects the entire string’s output because panels are wired in series. Module condition checks including broken glass and mounting verification form the foundation of effective maintenance routines. Document everything you find with photos or notes, including the date, location of issues, and severity. This record helps you track whether problems are stable or getting worse over time.
If you find significant debris, plan a cleaning session for the next dry day. If you discover cracks, delamination, or loose components, contact a qualified technician rather than attempting repairs yourself. Electrical work on live panels poses serious hazards, and structural issues need professional assessment. Small maintenance fixes you can handle yourself preserve your system’s performance while more complex issues get proper attention.
Pro tip: Inspect your panels at least twice yearly, ideally in spring after winter weather and autumn after summer heat and pollen season, so you catch seasonal debris before it impacts performance significantly.
Step 3: Clean Panels Using Approved Methods
Cleaning your solar panels properly restores their ability to capture sunlight and generate power. Dust, pollen, bird droppings, and mineral deposits accumulate over time, especially in the Benelux region where seasonal weather brings frequent debris. The right cleaning approach removes these contaminants without damaging the glass surface or affecting system performance.
Timing matters more than you might think. Clean your panels on a cool morning or late afternoon when temperatures are moderate. Never clean panels in direct midday sun because rapid evaporation leaves mineral streaks and water spots that reduce efficiency. If rain has recently fallen, wait a day or two for surfaces to dry completely so you can see what actually needs cleaning. Start by turning off your inverter at the main disconnect switch. This is non-negotiable because wet panels and active electricity create dangerous conditions. Your system won’t generate power during cleaning anyway, so this brief downtime causes no real loss. Fill your bucket or reservoir with deionized water, which lacks the minerals that tap water leaves behind as streaks. Deionized water costs more upfront but delivers superior results that justify the expense over time. Add a small amount of mild detergent designed for solar panels if buildup is heavy. Skip the household cleaners and industrial solvents because appropriate non-abrasive cleaning agents protect your investment from damage that reduces output and shortens lifespan.
Use your soft-bristled brush to gently remove loose debris first. Work from top to bottom so gravity helps material fall away naturally. Apply steady pressure without scrubbing aggressively, which scratches the protective glass coating. For stubborn bird droppings or dried residue, let your cleaning solution soak for a few minutes before attempting removal. Your squeegee pulls water off the surface without leaving streaks or spots. Drag it downward in smooth, overlapping strokes to clear water completely. Any water remaining on the surface evaporates and deposits minerals again, undoing your cleaning work. If you’re using a water-fed pole system from ground level, this approach eliminates fall risk entirely while still achieving excellent results. Environmentally safe, effective cleaning methods maintain panel integrity while removing contaminants that compromise performance. After cleaning, wait a few minutes for surfaces to dry completely before restarting your inverter. Check your system’s output on your monitoring app to confirm power generation has increased. A noticeable jump indicates the cleaning worked effectively.
Never pressure wash your panels because high-pressure water forces moisture into electrical connections and potentially damages seals. Avoid abrasive scrubbers, wire brushes, or anything that could gouge the glass surface. Stay away from acidic or alkaline chemicals that corrode the frame or degrade seals. If you live in an area with very hard water, using distilled or deionized water becomes even more critical than it otherwise would be. Some homeowners invest in rainwater collection systems, which provide free, naturally soft cleaning water that works beautifully.
Pro tip: Schedule cleaning after dry spells when dust and pollen accumulate most, and again after seasons with heavy leaf fall or bird activity, typically giving you two to four cleaning sessions annually depending on your specific location and environment.
Compare recommended solar panel cleaning times and their primary benefits:
Cleaning Timing | Main Benefit | Common Scenario |
Cool morning/late afternoon | Minimize water spots & thermal stress | Routine cleaning |
After dry, dusty periods | Restore power output quickly | High pollen or dust seasons |
After fall or bird activity | Remove corrosive residues | Heavy leaf drop or nests |
Step 4: Test System Performance via Monitoring Tools
Monitoring your solar system reveals whether it’s performing at its best or signaling that maintenance is needed. By regularly checking performance metrics, you catch problems early when they’re cheaper to fix and prevent small issues from becoming major failures. Modern monitoring tools give you real-time visibility into how much power your system generates and how efficiently it operates.
Start with your inverter display, which shows real-time power output in watts. Check this reading on a clear, sunny day around midday when your system should be generating peak power. Your system documentation specifies what maximum output looks like under ideal conditions. If actual output is significantly lower than expected, something is wrong. Note the discrepancy and investigate whether it’s caused by shading, dirty panels, or an inverter issue. Most residential systems in the Benelux region come with web-based or mobile monitoring apps that display performance over hours, days, weeks, and months. Log into your app regularly to review trends. Healthy systems show consistent output on similar weather days. Sudden drops or unexplained dips indicate problems worth investigating. Compare today’s output to the same date last year. Your system should generate similar amounts on similar conditions because panel efficiency decreases only gradually over years. If this year’s output is noticeably lower, cleaning, repairs, or component replacement may be necessary. Track your daily generation totals and monthly summaries to spot patterns. Weather affects output dramatically, but you can still identify concerning trends by comparing generation per unit of available sunlight. Advanced monitoring tools including power analyzers and irradiance sensors help evaluate system performance and detect degradation that reduces power generation.
Inverter error codes deserve your immediate attention. Your inverter display or app shows warning messages when problems occur. Some codes indicate temporary issues that resolve themselves, while others signal serious problems requiring professional help. Document any error codes you see, including when they appeared and how long they lasted. This information helps technicians diagnose problems faster. Many modern inverters now integrate with management systems that provide detailed diagnostics beyond basic output numbers. Temperature monitoring shows whether your inverter is overheating. String monitoring reveals whether individual panel strings are underperforming. Voltage and frequency readings indicate electrical system health. Stochastic modeling of photovoltaic systems helps predict system failures and optimize maintenance strategies based on real performance data. If your system includes battery storage, check the state of charge regularly. Batteries shouldn’t sit completely empty or fully charged for extended periods. Most battery management systems automatically handle this, but you should verify the charging and discharging patterns look reasonable. Review whether your system is actually providing the financial benefits you expected when you invested. Some monitoring apps show estimated savings or CO2 offset. If these numbers seem too low compared to your installation contract, investigate whether your system has underperformed.
Create a simple maintenance log noting when you check your system, what the readings were, and any issues you noticed. This record helps you spot gradual degradation over time and provides documentation if you ever need to file insurance or warranty claims. Monthly reviews take only minutes but deliver significant value in early problem detection.
Pro tip: Set up alerts in your monitoring app to notify you immediately if output drops below expected levels for your weather conditions, so you catch problems within hours rather than days.
Step 5: Verify Maintenance Results and Document Actions
Documentation transforms your maintenance work from a one-time effort into a valuable long-term record that protects your investment and guides future decisions. By recording what you did and verifying the results, you create evidence of proper care that supports warranty claims, helps technicians diagnose problems faster, and shows potential buyers that your system receives professional attention. This final step ensures your maintenance efforts deliver maximum value.
Start by comparing your system’s performance before and after maintenance. Pull up your monitoring app and note the power output on a clear day before you performed any work. After cleaning, repairs, or component checks, compare output on a similar sunny day under comparable conditions. A significant increase in generation confirms your maintenance had positive impact. Document the exact improvement with dates and output numbers. If you cleaned panels, you might see output jump by 5 to 15 percent depending on how dirty they were. If you tightened loose connections, voltage readings should stabilize and show no more fluctuations. If you fixed shading issues, performance should improve consistently on days when that shading previously occurred. Take photos before and after your maintenance work to create visual documentation. Pictures of dirty panels before cleaning and clean panels after show the work you performed. Photos of corroded connections before repair and clean connections after provide clear evidence. Store these photos in a cloud backup or file folder so they’re accessible years later when you need them. Record all inverter error codes that disappeared after your actions. Document any replaced components with model numbers, part numbers, serial numbers, and the date of replacement. This information matters for warranty purposes and helps technicians understand your system’s history.
Create a maintenance log sheet for your records. Note the date you performed work, what specific actions you took, who performed the work, and what results you observed. Include weather conditions on the day you worked because this context helps explain performance variations. Record voltage readings, temperature measurements, and any other test results from your multimeter or infrared thermometer. Thorough documentation of all maintenance activities enables traceability and supports informed decisions for future maintenance. Keep receipts for any replacement parts or cleaning supplies you purchase. These receipts provide proof that you’ve maintained your system and can support insurance claims if damage occurs. Store receipts with your maintenance log so everything stays together. Your system documentation should include the original installation report, warranty paperwork, and any service records from your installer. Add your own maintenance logs to this collection. Over time, you’ll build a complete history that shows exactly what’s been done to your system and when.
If you’re enrolled in a monitoring service or have a professional maintenance contract, provide copies of your documentation to that provider. This ensures their records match your observations and prevents duplicate work. Structured documentation and verification processes optimize system reliability and support continuous improvement. Set reminders on your calendar for regular maintenance intervals so you don’t forget when the next cleaning or inspection is due. Annual maintenance reviews give you a chance to assess whether your schedule is working well or needs adjustment based on your region’s weather patterns and debris accumulation rates. Your documentation will show you exactly how often problems occur and help you optimize timing.
Pro tip: Create a simple spreadsheet with columns for date, maintenance type, time invested, materials used, performance before and after, and notes, making it easy to spot trends and share your maintenance history with technicians or future owners.
Maximize Your Solar Panel Efficiency with Belinus Energy Solutions
Maintaining your solar panels for maximum efficiency involves careful inspection, expert cleaning, and advanced performance monitoring. The challenges discussed in the article like preventing electrical hazards, managing debris buildup, and verifying system output demand not only effort but intelligent technology that supports your daily maintenance. If you want to tackle issues such as shading, panel soiling, and performance drops while optimizing your energy usage Belinus offers integrated solutions designed to simplify and enhance solar system management.
Take advantage of Belinus’s comprehensive energy platform including Solis Inverters equipped with our intelligent Energy Management System for real-time optimization. Combine this with battery storage options like the Energy Wall G1 to store clean solar power and the ETAP Pro EV Charger for smart electric vehicle charging. Our centralized EMS with 15-minute interval tariff optimization makes sure you get the highest return on your PV system investment while reducing maintenance guesswork. Act now to transform your solar panel upkeep into a seamless experience. Learn more about our innovative residential and commercial solutions at Belinus, and discover how we can help you protect and maximize your solar asset’s lifetime today.
Frequently Asked Questions
How often should I inspect my solar panels for damage?
You should inspect your solar panels at least twice a year, ideally in the spring and autumn. Check for debris accumulation, physical damage, and electrical issues to maintain optimal performance.
What tools do I need for solar panel maintenance?
Essential tools include personal protective equipment like insulated gloves and safety glasses, inspection tools like a digital multimeter, and cleaning supplies such as soft-bristled brushes and deionized water. Gather everything in a labeled, weatherproof container for easy access during your maintenance work.
How do I clean solar panels safely?
Clean your solar panels in the early morning or late afternoon to avoid direct sunlight and heat. Use deionized water and a soft-bristled brush to safely remove dust and debris, and finish with a squeegee to prevent streaking.
What should I do if my solar system’s output drops?
If your solar system’s output drops significantly, first check for shading or dirt on the panels and clean them if necessary. If the issue persists, document the readings and consider contacting a qualified technician to investigate electrical problems.
How can I track the effectiveness of my maintenance efforts?
To track the effectiveness of your maintenance, compare your system’s power output before and after maintenance actions. Document the changes, noting improvements in performance to ensure your system is operating efficiently.
Why is documentation important for solar panel maintenance?
Documentation is vital as it creates a record of your maintenance activities, which can support warranty claims and help technicians understand your system’s history. Keep a maintenance log that includes dates, actions taken, and performance observations for easy reference.
Recommended
Comments